

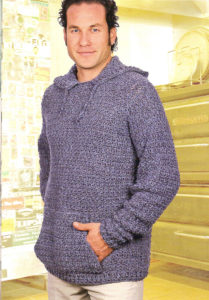
Who knew that a hoodie would become a timeless classic? I’ve always had a hooded sweatshirt or two in my closet, so I wanted to design a crochet version. The soft and comfy fiber used here creates a denim look.
Dawg
©2008-2016 Drew Emborsky, aka The Crochet Dude®
Skill Level
Intermediate
Finished Size
S (M, L, XL, XXL): 42 (44, 46, 48, 50)”/106.5 (112, 117, 122, 127)cm
Sweater shown in size M.
You Will Need
1673 (1725, 1935, 2091, 2196)yd/1530 (1578, 1770, 1912, 2008)m of #4 medium weight yarn
Yarn Used: Moda Dea Fashionista, 50% acrylic/50% tencel lyocell, 31⁄2oz/ 100g = 183yd/168m per skein
10 (10, 11, 12, 12) skeins, Blue Jean (#6130)
I’ve just learned that Moda Dea Fashionista has been discontinued. I think a good substitute yarn that would give the same effect would be Deborah Norville’s Everyday Worsted Heathers – Click HERE to see
Hook: 5.00mm (size H-8 U.S.) (or size to obtain gauge)
Yarn needle
Long sewing pins
Stitch marker
Stitches Used
Back post double crochet (BPdc) Chain stitch (ch)
Double crochet (dc)
Front post double crochet (FPdc) Single crochet (sc)
Slip stitch (sl st)
Gauge
12 sts x 10 rows = 4”/10cm in pattern stitch
Always take time to check your gauge.
Instructions
Pattern Stitch
Row 1: Sc in 2nd ch from hook, dc in next ch, *sc in next ch, dc in next ch;
rep from * across, turn.
Row 2: Ch 3 (counts as dc), sc in next sc, *dc in next dc, sc in next sc; rep from * across, turn.
Row 3: Ch 1, sc in same first sc, dc in next dc, *sc in next sc, dc in next dc; rep from * across, turn.
Repeat rows 2–3 for pattern.
Back
Ch 65 (67, 71, 73, 77).
Work even in pattern stitch on 64 (66, 70, 72, 76) sts until piece measures 15 (151⁄2, 16, 16, 161⁄2)”/38 (39.5, 40.5, 40.5, 42)cm from beg.
SHAPE ARMHOLES
Next row: Work in established pattern across to within last 8 sts, turn, leaving rem sts unworked—56 (58, 62, 64, 68) sts.
Next row: Rep last row—48 (50, 54, 56, 60) sts.
Work even in pattern until piece measures 24 (25, 26, 261⁄2, 271⁄2)”/61 (63.5, 66, 67.5, 70)cm from beg.
Fasten off.
Front
Work as for back including armhole shaping until piece measures 22 (23, 24, 241⁄2, 251⁄2)”/56 (58.5, 61, 62, 65)cm from beg.
SHAPE FIRST SHOULDER
Next row: Work in pattern across first 16 (16, 16, 18, 18) sts, turn, leaving rem sts unworked—16 (16, 16, 18, 18) sts.
Work even until piece measures 24 (25, 26, 261⁄2, 271⁄2)”/61 (63.5, 66, 67.5, 70)cm from beg. Fasten off.
SHAPE SECOND SHOULDER
Next row: Sk 15 (18, 22, 20, 24) sts to the left of last st made in first row of first shoulder, join yarn in next st, work in established pattern across, turn—16 (16, 16, 18, 18) sts.
Work even in pattern until piece measures 24 (25, 26, 261⁄2, 271⁄2)”/61 (63.5, 66, 67.5, 70)cm from beg. Fasten off.
Sleeve (make 2)
Ch 23 (23, 29, 31, 31).
Work even in pattern stitch for 4 rows—22 (22, 28, 30, 30) sts. Maintaining pattern stitch, inc 1 st in pattern at end of each row until 53 (57, 59, 63, 65) sts are on work. Work even until length of sleeve measures 24 (251⁄2, 26, 261⁄2, 27)”/61 (65, 66, 67.5, 68.5)cm from beg.
Pocket
Ch 41.
Rows 1–8: Work even in pattern stitch, turn—40 sts.
Rows 9–12: Work in pattern stitch across to within 2 sts, turn, leaving rem sts unworked—32 sts at end of last row.
Rows 13–21: Work even in pattern stitch, turn. Fasten off.
EDGING
Rnd 1: Ch 1, sc evenly around entire pocket, sl st in first sc to join. Fasten off.
Drawstring
Make a 60”/152.5cm long ch. Fasten off. Tie ea end of drawstring in an overhand knot.
Assemble
Sew shoulder seams. Set in sleeves. Sew sleeve and side
seams. Center pocket on front of sweater, sew in
place, leaving sides of rows 9–21 unattached.
Finishing
HOOD
Row 1: With RS facing, join yarn at center front of neck opening, work in row 1 of pattern stitch around entire neck opening, working a multiple of 4 sts. Do not join, turn
Work even in pattern stitch until hood measures
12”/30.5cm from beg.
SHAPE FIRST SIDE
Place marker at center of last row
Row 1: Work even in pattern stitch across to within 2 sts of center marker, turn, leaving rem sts unworked.
Row 2: Work even in pattern stitch across, turn.
Row 3: Work even in pattern stitch across to within last 2 sts, turn, leaving rem sts unworked.
Row 4: Work even in pattern stitch across, turn. Fasten off.
SHAPE SECOND SIDE
Row 1: Sk 2 sts to the left of center marker, work in pattern stitch across, turn.
Row 2: Work even in pattern stitch across, turn.
Row 3: Sl st in first 3 sts, work in pattern stitch across, turn.
Row 4: Work even in pattern stitch across, turn. Fasten off.
BOTTOM RIBBING
Rnd 1: With RS facing, join yarn on bottom edge at one side seam, ch 3 (counts as dc), dc evenly around, working an even number of sts
Rnd 2: Ch 2 (counts as hdc), *BPdc around the post of next dc, FPdc around the post of next dc; rep from * around, ending with BPdc around the post of last dc, sl st in 2nd ch of beg ch-2 to join.
Rnd 3: Rep rnd 2. Fasten off. CUFFS
Rnd 1: With RS facing, join yarn on cuff edge of one sleeve, at seam, ch 3 (counts as dc), dc evenly around, working an even number of sts.
Rnds 2–3: Rep rnds 2–3 of bottom ribbing. Fasten off.
Rep cuff on other sleeve.
HOOD RIBBING
Row 1: With RS facing, join yarn
at lower right-hand corner of hood edge, ch 3 (counts as dc), dc evenly across to lower left-hand corner, working an even number of sts
Row 2: Ch 2 (counts as hdc), *BPdc around the post of next dc, FPdc around the post of next dc; rep from * across, ending with hdc in top of ch-3 tch, turn.
Row 3: Rep row 2. Fasten off Weave in ends.
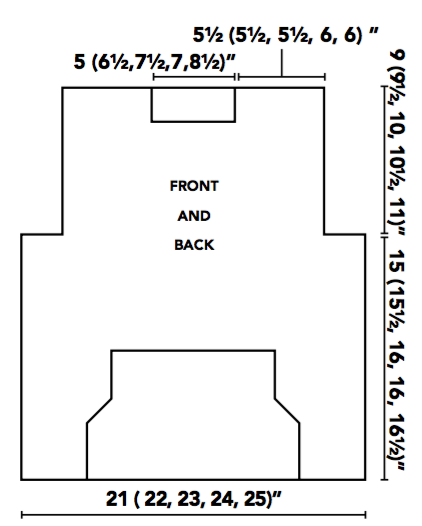
front and back diagram
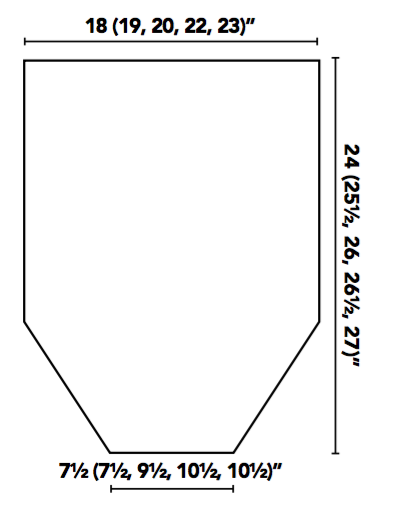
sleeve diagram
The Crochet Dude® is a registered trademark of Drew Emborsky, all rights reserved. Do no copy or distribute this pattern – but please share the link with all your friends! Click the green Print Friendly button to print or save as a PDF for your own use.
Please click one of the icons below to share this tutorial on your favorite social media sites!
Add this project to your Ravelry queue: 


How many chs. do you start with? I can’t seem to find it in the directions.
The info is right under the section titled “Back”
Do you recommend any other yarn since the Moda is discontinued?
I think you’d do well with Deborah Norvilles Everyday Heathers – https://www.premieryarns.com/collections/deborah-norville-collection/products/dneheathrs
I really like the look of “Dawg”, including the yarn. After doing a search for Moda Dea Fashionista, I have found this yarn to be discontinued, and I’m not finding anywhere to buy it. What would be the closest yarn I can substitute to give me this look?
Well dang, I really hate when that happens. I think the good substitute would be Deborah Norville’s Everyday Heathers – check it out here: https://www.premieryarns.com/collections/deborah-norville-collection/products/dneheathrs
Thanks for the recommendation. It looks like it will work good.
Hi Drew, you have 3 quantities of yarn listed…the first two are in yards and the last one is in metric. which of the two listed in yards is the correct one?
Thanks for pointing that out! It was a copy/paste error apparently. I have corrected the pattern. I appreciate it!
Hi Drew,
You have listed 3 sets of quantities for the yarn…is the first one for the Moda Dea yarn and the second one for the Deborah Norville yarn?
Hi Arla! The first one is the yardage so that you can use whatever worsted weight yarn you’d like, the second shows what I used (Moda Dea) but I’ve recently discovered that it has been discontinued. So if you’d like to try the Deborah Norville then I would suggest using the first set of yard/meters need (right under the words “You Will Need”). Hope that helps!
If i increased the xxl pattern by 2 stitches would it make it xxxl? My hubby is a 3xl
Or should i just use either a size or 2 larger hook to get the 3 xl size
Tks
It would definitely be easier if you went up in hook size, that way the entire pattern would be bigger.
This is an awesome pattern and I’m excited to start! Thank you so much!
So i’m just a little confused… when you start the ch 65 for whatever count you need for the size (m, l, xl), what should the 65 ch measure in length? For example, i’m making mine XL. After i complete my 73 chains what should the chain measure in inches? I might be reading the chart wrong.. but should chs measure 24 inches? Sorry i’m still learning how to read patterns and i have already started my project. I don’t want to go too far and come to the end and it look like crap.
dose any one know how to turn this into a knitted pattered?