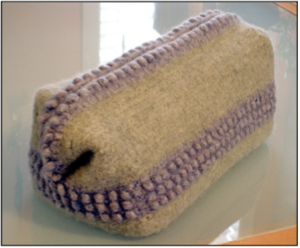
Men’s Felted Shaving Kit
©2014-2016 by Drew Emborsky, aka The Crochet Dude®
Finding a great shaving kit is like finding gold under your sofa! In my search for the perfect saving kit to take with me on my travels I decided to create my own, and felting was the obvious choice. This little bag whips up quickly and can take the abuse of hitting the road with you everywhere you go.

Size
Length: 10.5” Height: 6.25” Width: 5.5
Yarn – worsted weight wool in two colors – 880 yds for CA, 220 yds for CB
Sample shown in:
Wisdom Yarns Duet 100% wool (100 g – 300 m – 220 yds)
4 balls #601 Sapling – CA 1 ball #651 Twilight- CB
Crochet Hook
The Crochet Dude® Ergo Hook size K/10.5 – 6.50mm
Notions
14” All-purpose zipper – green; Sewing thread – green; Sewing needle
Gauge before felting
20 sts and 20 rows = 10 cm (4”) in sc
Special Stitch
Bobble – insert hook in st indicated, yo, pull up loop, ch 4, yo, pull through both loops on hook
Bottom
With CA
Row 1 (RS) Ch 26, sc into 2nd ch from hook and into ea ch across, turn (25 sc) Rows 2-48 Ch 1, sc into ea st across (25 sc)
Fasten off
Short sides
With RS facing attach Sapling to first st with sl st
Rows 1-10 Ch 1, sc across, turn (25 sc)
Fasten off
With RS facing attach CB to first st with sl st
Row 11 Ch 1, sc, * bobble, sc, repeat from * across, turn Row 12 Ch 1, sc across
Rows 13-16 Repeat Rows 11-12
Fasten off
With RS facing attach CA to first st with sl st
Rows 13-32 Ch 1, sc across, turn (25 sc)
Fasten off
Long Sides
Work as for short sides working first row into end sts of the rows of the bottom piece and working 49 sts across
Turn inside out and whipstitch sides together, being careful to match perfectly where the stripes meet
Zipper casing – to create casing for zipper you will work the piece of fabric that you will later attach the zipper to by working in the back loops. Next you will return and work in CB in the front loops of the same stitches to create decorative cover.
Working around the mouth of project, with RS facing attach CA to BL of any st
Rnd 1 Ch1, sc in BL of ea st around, join with a sl st to first sc, do not turn (148 sc)
Rnds 2-4 Ch 1, sc in ea st around, join with a sl st to first sc, do not turn
Fasten off.
Return and working in the FL of same sts, attach CB in FL of any st
Rnd 1 Ch 2, hdc in ea st around, join with a sl st to first hdc, do not turn
Rnd 2 Ch 1 * Sc, bobble around, repeat from * around, join with a sl st to first sc, do not turn
Rnd 3 Ch 1, sc in ea st around, join with a sl st to first sc
Fasten off
Felt
Using the hottest temperature setting run project through one cycle of your washing machine or until size equals the finished measurements indicated. Let dry completely.
Finishing
Attach zipper according to manufacturer’s instructions. Attach magnetic purse snaps to each end of the project according to manufacturer’s instructions, one half inside zipper casing at end, the other side just above the blue stripe on the short side of project
The Crochet Dude® is a registered trademark of Drew Emborsky, all rights reserved. Duplication or distribution of this pattern in any form is strictly prohibited – but feel free to link to it! Also, click on one of the icons below to share on your fave social media site!


