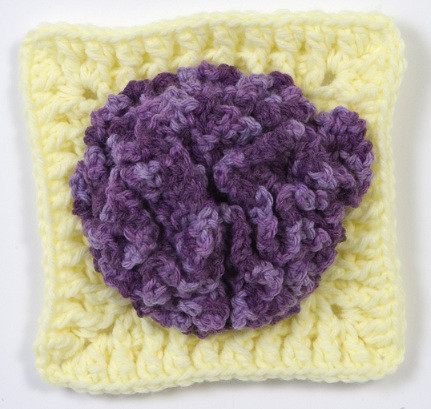
Be creative with the color of the flower! You could work each round in a different color, or edge the flower in a contrasting color – use your imagination and just go for it! Keep the background color a lighter one like beige, or yellow, etc. That way all the carnations will POP.
Carnation Bouquet Afghan Square
©2011 Drew Emborsky, aka The Crochet Dude®
All rights reserved, used by permission
Materials
1 oz worsted weight yarn each color for the flower and the background.
The Crochet Dude® size H/8-5.00mm crochet hook from Boye®
Gauge
Each square should measure 7″ when finished. Please be sure that yours is as close to 7″ as possible so that they will all fit together nicely! Use the size hook that you need in order to get a 7″ square.
Designer Note: please start and end the square leaving a long tail, about 6″.
Flower
With flower color, ch 4, sl st to first st to form ring.
Rnd 1: Ch 1, 8 sc in ring, sl st to first sc. (8 sc)
Rnd 2: Ch 3 (counts as first dc), dc in same st, 2 dc in ea sc around, sl st to top of beg ch-3. (16 dc)
Rnd 3: Ch 1 (does NOT count as st), 3 fpdc in ea st around. Do not join, (48 dc)
Rnd 4: 3 fpdc in ea st around. Do not join. (144 dc)
Rnd 5: Ch 1, (does not count as st), [sc, ch 2] in ea st around. Sl st to first sc of rnd. Fasten off. (144 sc)
Background
You will be working into the tops of the sts from Rnd 2 of the flower. Hold the flower so that the front (rounded) side of it is facing you, attach the background color with a sl st to any of the sts of Rnd 2.
Rnd 1(RS): Ch 5 (counts as first dc + ch-2), 2 dc in same st, dc in each of next 3 sts, * [2 dc, ch 2, 2 dc] in next st, dc in each of next 3 sts, rep from * two more times, dc once more in first st, join with a sl st to 3rd ch of beg ch-5.
Rnd 2: Sl st into ch-2 space, ch 5 (counts as first dc + ch-2), 2 dc in same space, dc in next 7 sts, * [2 dc, ch 2, 2 dc] in ch-2 space, dc in next 7 sts, rep from * two more times, dc once more in first space, join with a sl st to 3rd ch of beg ch-5
Rnd 3: Sl st into ch-2 space, ch 5 (counts as first dc + ch-2), 2 dc in same space, [fpdc around next dc, bpdc around next dc] 6 times, fpdc around next dc, * [2 dc, ch 2, 2 dc] in corner sp, [fpdc around next dc, bpdc around next dc] 6 times, fpdc around next dc, rep from * two more times, dc once more in first space, join with a sl st to 3rd ch of beg ch-5.
Rnd 4: Sl st into ch-2 space, ch 5 (counts as first dc + ch-2), dc in same st, [2 fpdc in next st, sk 1 st] 9 times, 2 fpdc in next st, * [dc, ch 2, dc] in corner sp, [2 fpdc in next st, sk 1 st] 9 times, 2 fpdc in next st, rep from * two more times, join with a sl st to 3rd ch of beg ch-5
Fasten off.
Finishing
Weave in the tails, making sure to weave them on the back side of the square, going back and forth until you have woven in about 4 inches of the tail. That way the squares will never fall apart!
Abbreviations
Beg = beginning
Bpdc = back post double crochet
Ch = chain
Dc = double crochet
Fpdc = front post double crochet
Rep = repeat
RS = right side
Sc = single crochet
Sl st = slip stitch
Sp = space
St(s) = stitch(es)
The Crochet Dude® is a registered trademark of Drew Emborsky, all rights reserved. Do no copy or distribute this pattern – but please share the link with all your friends! Click the green Print Friendly button to print or save as a PDF for your own use.
Add this to your Ravelry queue! 
Please click one of the icons below to share this tutorial on your favorite social media sites!


