


When I first became a designer, I decided to deconstruct some garments. I saw a way of recreating them in strips that would make it easy to modify the fit perfectly. This is the first time I’ve ever used this method on a man’s garment. I love how it turned out!
To Aran Is Human
©2008-2016 Drew Emborsky, aka The Crochet Dude®
Skill Level
Intermediate
Finished Size
S (M, L, XL, XXL): 391⁄2 (421⁄2, 451⁄2, 471⁄2, 501⁄2)”/100.5 (108, 115.5, 120.5, 128.5)cm
Sweater shown in size XXL.
You Will Need
1784 (1976, 2231, 2323, 2457)yd/1632 (1807, 2040, 2124, 2247)m of 4 medium weight yarn, in cream
Yarn Used: Moda Dea Fashionista, 50% acrylic/50% Tencel/Lyocell, 31⁄2oz/ 100g = 183yd/168m per skein
10 (11, 13, 13, 14) skeins, Ivory (#6113)
Hook: 5.00mm (size H-8 U.S.) (or size to obtain gauge)
Stitch markers
Yarn needle
Stitches Used
Back post double crochet (BPdc)
Chain stitch (ch)
Double crochet (dc)
Front post double crochet (FPdc)
Slip stitch (sl st)
Special Stitches
Each panel uses special stitches unique to that panel. See definitions for special stitches at the beginning of each panel instruction.
Gauge 15 sts x 8 rows = 4”/10cm in pattern stitch of Panel C
Always take time to check your gauge.
Instructions
Note: This sweater is worked up in panels or “strips,” which you then whipstitch together. Feel free to lengthen or shorten the panels to fit your body type.
1 x 1 Ribbing Pattern
Row 1: Ch 3 (counts as dc), dc evenly across, turn.
Row 2: Ch 2 (counts as hdc), *FPdc around the post of next st, BPdc around the post of next st; rep from * across to within last st, hdc in last st, turn.
Panel A (make 2)
SPECIAL STITCHES
Front post treble crochet (FPtr): Yo (twice), insert hook from front to back to front again around the post of next designated st, yo, draw yarn though st, (yo, draw yarn through 2 loops on hk) 3 times, sk st behind FPtr just made.
Cable A (Cbl-A): Sk next 2 sts, FPtr around the post of next st, BPdc around the post of 2nd skipped st, FPtr around the post of 1st skipped st.
Cable B (Cbl-B): Sk next 2 sts, FPtr around the post of next st, BPdc around the post of 2nd skipped st, working under the front post just made, work FPtr around the post of 1st skipped st.
PATTERN STITCH
Ch 25 (25, 25, 29, 29).
Foundation row: Dc in 4th ch from hook and in each ch across, turn— 23 (23, 23, 27, 27) sts.
Row 1 (RS): Ch 2, BPdc around the post of next st, *Cbl-A across next 3 sts, BPdc around the post of next st; rep from * across, ending with hdc in last st, turn.
Row 2: Ch 2, FPdc around the post of every front raised st; BPdc around the post of every back raised st, hdc in last st, turn.
Row 3: Ch 2, sk next st, FPdc around the post of next st, BPdc around the post of last skipped st, BPdc around the post of next st, *Cbl-B across next 3 sts, BPdc around the post of next st; rep from * across to within last 3 sts, sk next st, BPdc around the post of next st, FPdc around the post of last skipped st, hdc in last st, turn.
Row 4: Rep row 2.
Row 5: Ch 2, sk next st, BPdc around the post of next st, sk one more st, FPtr around the post of next st, BPdc around the post of 2nd skipped st, FPtr around the post of 1st skipped st *BPdc around the post of next st, Cbl-A across next 3 sts; rep from * across to within last 5 sts, sk next 3 sts, FPtr around the post of next st, BPdc around the post of 2nd skipped st, FPtr around the post of 1st skipped st, BPdc around the post of 3rd skipped st, hdc in last st, turn.
Rep rows 2–5 until panel measures 351⁄2 (38, 401⁄2, 40, 40)”/90 (96.5, 103, 101.5, 101.5)cm; place stitch markers at beg and end of row at 17 (19, 21, 20, 20)”/43 (48.5, 53.5, 51, 51)cm from beg.
Panel B (make 2)
SPECIAL STITCHES
Cable A (Cbl-A): Sk next st, FPdc around the post of next st, FPdc around the post of last skipped st.
Cable B (Cbl-B): Sk next st, BPdc around the post of next st, FPdc around the post of last skipped st.
Cable C (Cbl-C): Sk next st, FPdc around the post of next st, BPdc around the post of last skipped st.
Cable D (Cbl-D): Sk 2 sts, FPtr around the post of next st, BPdc around the post of 2nd skipped st, FPtr around the post of 1st skipped st.
PATTERN STITCH
Ch 26.
Foundation row: Dc in 4th ch from hook and in each ch across, turn—24 sts.
Row 1 (RS): Ch 2, BPdc in next 2 sts, Cbl-A, BPdc in next 2 sts, FPdc in next st, BPdc in next 11 sts, FPdc in next st, BPdc in next 3 sts, hdc in last st, turn.
Row 2 and all even-numbered rows: Ch 2, FPdc around the post of every front raised st; BPdc around the post of every back raised st, hdc in last st, turn.
Row 3: Ch 2, BPdc in next 2 sts, Cbl-A, BPdc in next 2 sts, Cbl-B, BPdc in next 9 sts, Cbl-C, BPdc in next 3 sts, hdc in last st, turn.
Row 5: Ch 2, BPdc in next 2 sts, Cbl-A, BPdc in next 3 sts, Cbl-B, BPdc in next 7 sts, Cbl-C, BPdc in next 4 sts, hdc in last st, turn.
Row 7: Ch 2, BPdc in next 2 sts, Cbl-A, BPdc in next 4 sts, Cbl-B, BPdc in next 5 sts, Cbl-C, BPdc in next 5 sts, hdc in last st, turn.
Row 9: Ch 2, BPdc in next 2 sts, Cbl-A, BPdc in next 5 sts, Cbl-B, BPdc in next 3 sts, Cbl-C, BPdc in next 6 sts, hdc in last st, turn.
Row 11: Ch 2, BPdc in next 2 sts, Cbl-A, BPdc in next 6 sts, Cbl-B, BPdc in next st, Cbl-C, BPdc in next 7 sts, hdc in last st, turn.
Row 13: Ch 2, BPdc in next 2 sts, Cbl-A, BPdc in next 7 sts, Cbl-D, BPdc in next 8 sts, hdc in last st.
Row 15: Ch 2, BPdc in next 2 sts, Cbl-A, BPdc in next 6 sts, Cbl-C, BPdc in next st, Cbl-B, BPdc in next 7 sts, hdc in last st, turn.
Row 17: Ch 2, BPdc in next 2 sts, Cbl-A, BPdc in next 5 sts, Cbl-C, BPdc in next 3 sts, Cbl-B, BPdc in next 6 sts, hdc in last st, turn.
Row 19: Ch 2, BPdc in next 2 sts, Cbl-A, BPdc in next 4 sts, Cbl-C, BPdc in next 5 sts, Cbl-B, BPdc in next 5 sts, hdc in last st, turn.
Row 21: Ch 2, BPdc in next 2 sts, Cbl-A, BPdc in next 3 sts, Cbl-C, BPdc in next 7 sts, Cbl-B, BPdc in next 4 sts, hdc in last st, turn.
Row 23: Ch 2, BPdc in next 2 sts, Cbl-A, BPdc in next 2 sts, Cbl-C, BPdc in next 9 sts, Cbl-B, BPdc in next 3 sts, hdc in last st, turn. Rep rows 1–23 until panel measures 52 (56, 60, 60, 60)”/132 (142, 152.5, 152.5, 152.5)cm from beg. Fasten off.
Panel C (make 1)
Ch 13 (19, 25, 25, 31).
Foundation row (WS): Dc in 4th ch from hook and in each ch across, turn—11 (17, 23, 23, 29) sts. Rows 1–2: Ch 2, *BPdc in next 3 sts**,
FPdc in next 3 sts; rep from * across, ending last rep at **, hdc in last st, turn.
Rows 3–4: Ch 2, *FPdc in next 3 sts**, BPdc in next 3 sts; rep from * across, ending last rep at **, hdc in last st, turn.
Rep rows 1–4 until panel measures 221⁄2 (241⁄2, 261⁄2, 261⁄2, 261⁄2)”/57 (62, 67.5, 67.5, 67.5)cm from beg.
Panel D (make 2)
These are the panels for the top of the sleeve. You’ll first establish the cabling up the center of the panel in the first few rows. Then, as you increase the number of sts on the sides as indicated, be sure to work the cables in the middle as established.
SPECIAL STITCHES
Cable A (Cbl-A): Sk next 2 sts, FPtr around the post of next 2 sts, BPtr around the post of 1st skipped st, BPtr around the post of 2nd skipped st.
Cable B (Cbl-B): Sk next 2 sts, BPtr around the post of next 2 sts, FPtr around the post of 1st skipped st, FPtr around the post of 2nd skipped st.
Cable C (Cbl-C): Sk next 2 sts, FPtr around the post of next 2 sts, FPtr around the post of 1st skipped st, FPtr around the post of 2nd skipped st.
PATTERN STITCH
Ch 20.
Foundation row: Dc in 4th ch from hook and in each ch across, turn—18 sts.
Row 1 (RS): Ch 2, BPdc in next 4 sts, Cbl-A, Cbl-B, BPdc in next 4 sts, hdc in last st, turn.
Row 2: Ch 2, FPdc around the post of every front raised st; BPdc around the post of every back raised st, hdc in last st, turn.
Row 3: Ch 2, BPdc in next 4 sts, Cbl-B, Cbl-A, BPdc in next 4 sts, hdc in last st, turn.
Row 4: Ch 2, FPdc around the post of every front raised st; BPdc around the post of every back raised st, hdc in last st, turn.
Row 5: Ch 2, BPdc in next 6 sts, Cbl-C, BPdc in next 6 sts, hdc in last st, turn.
Row 6: Ch 2, FPdc around the post of every front raised st; BPdc around the post of every back raised st, hdc in last st, turn.
Rep rows 1–6 for pattern.
Work in pattern stitch, inc 1 st at beg and end of row 2 and every other row 9 times more; then inc 1 st at beg and end of every row until 68 (68, 68, 76, 76) sts are on work; work even until panel measures 181⁄2 (19, 191⁄2, 20, 20)”/47 (48.5, 49.5, 51, 51)cm from beg. Remember as you do the increases to maintain the cabling up the center of the panel.
Panel E-1 (make 1 for L, X, and XXL only)
SPECIAL STITCHES
BPdc2tog: (Yo, insert hook from back to front to back again around next st, yo, draw yarn through st, yo, draw yarn through 2 loops on hook) twice, yo, draw yarn through 3 loops on hook.
FPdc2tog: (Yo, insert hook from front to back to front again around next st, yo, draw yarn through st, yo, draw yarn through 2 loops on hook) twice, yo, draw yarn through 3 loops on hook.
Cable A (Cbl-A): Sk next st, FPdc around the post of next st, FPdc around the post of last skipped st.
PATTERN STITCH
Ch 10.
Foundation row: Dc in 4th ch from hook and in each ch across, turn—8 sts.
Row 1: Ch 2, BPdc in next 2 sts, Cbl-A, BPdc in next 2 sts, hdc in last st, turn.
Row 2: Ch 2, FPdc in next 2 sts, BPdc in next 2 sts, FPdc in next 2 sts, hdc in last st, turn.
Rows 3–54: Rep rows 1–2.
Row 55: Ch 2, BPdc2tog in next 2 sts, Cbl-A, BPdc in next 2 sts, hdc in last st, turn.
Row 56: Ch 2, sk next st, FPdc2tog in next 2 sts, BPdc in next 2 sts, hdc in last st, turn.
Row 57: Ch 2, sk next st, BPdc2tog in next 2 sts, hdc in last st. Fasten off.
Panel E-2 (make 1 for L, X, and XXL only)
SPECIAL STITCHES
BPdc2tog: (Yo, insert hook from back to front to back again around next st, yo, draw yarn through st, yo, draw yarn through 2 loops on hook) twice, yo, draw yarn through 3 loops on hook.
FPdc2tog: (Yo, insert hook from front to back to front again around next st, yo, draw yarn through st, yo, draw yarn through 2 loops on hook) twice, yo, draw yarn through 3 loops on hook.
PATTERN STITCH
Work same as Panel E-1 through Row 54.
Row 55: Ch 2, BPdc in next 2 sts, Cbl-A, BPdc2tog in next 2 sts, hdc in last st, turn.
Row 56: Ch 2, BPdc in next 2 sts, FPdc2tog in next 2 sts, sk next st, hdc in last st, turn.
Row 57: Ch 2, BPdc2tog in next 2 sts, sk next st, hdc in last st.
Fasten off.
Assemble
Use chart below as guide and sew panels together. When attaching Panel A to Panel B on front and back, only stitch from the bottom of the project up to the stitch markers, leaving an armhole and the rest of Panel A unattached; this is the underside of the Sleeve. Attach D last. Remember that Panels E-1 and E-2 are omitted for sizes S and M.
Finishing
BOTTOM EDGING
Row 1: With RS facing, join yarn at bottom right-hand corner of right front, ch 3, dc evenly across bottom edge to bottom left-hand corner of left front, working an even number of sts, turn.
Row 2: Ch 2 (counts as hdc), *FPdc around the post of next st, BPdc around the post of next st; rep from * across to within last st, hdc in last st, turn. Fasten off.
SLEEVE EDGING
Rnd 1: With RS facing, join yarn at seam on cuff edge of one sleeve, ch 3, dc evenly around cuff edge, working an even number of sts, sl st in 3rd ch of beg ch-3 to join, turn.
Rnd 2: Ch 2, *FPdc around the post of next st, BPdc around the post of next st; rep from * around to within last st, FPdc in last st, sl st in 2nd ch of beg ch-3 to join.
Fasten off.
PLACKET
Row 1: With RS facing, join yarn at bottom right-hand corner of right front, ch 3, dc evenly across right front edge, across back next edge, and down left front edge to bottom left-hand corner of left front, working an even number of sts, turn.
Row 2: Working in row 2 of 1 x 1 ribbing pattern for 3 sts, ch 1, sk next st, *work in ribbing pattern for 17 sts, ch 1, sk next st; rep from * 2 more times (4 buttonholes made), work in ribbing pattern across. Fasten off.
Weave in ends.
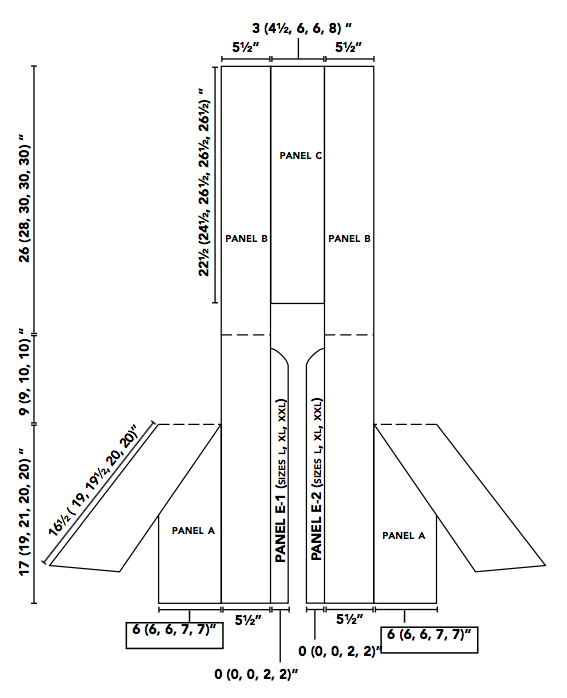
Sweater Diagram
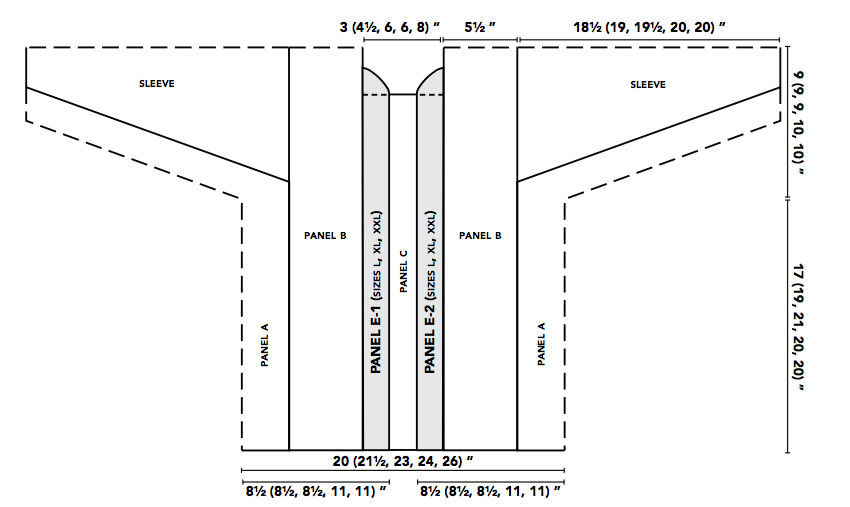
Constructed schematic diagram
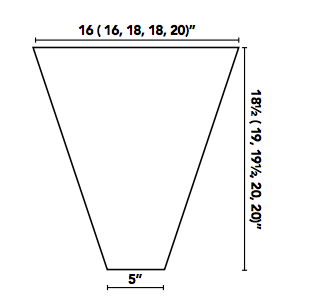
Sleeve diagram
The Crochet Dude® is a registered trademark of Drew Emborsky, all rights reserved. Do no copy or distribute this pattern – but please share the link with all your friends! Click the green Print Friendly button to print or save as a PDF for your own use.
Please click one of the icons below to share this tutorial on your favorite social media sites!
Add this project to your Ravelry queue: 


Hi, I’m having a hard time figuring out the difference between Cable A and Cable B in Panel A. Basically, what does the “working under the front post just made” portion mean? I’ve just been doing it the same as Cable A but obviously there is supposed to be a difference since it’s named as its own cable…thank you!!
Hi Katie, sorry it took so long to reply – I’ve not had access to my computer since Thanksgiving which is a whole other story I won’t get into. Anywho, I have a faint recollection of why the tech editor thought that that panel needed to have an A and a B, but as I look at it there seems to be no difference between the two.
Great pattern… this is how i make many of my creations… Mostly toddler’s because i like instant gratification..LOL Been wondering when someone else would post similar pattern… I love crochet best because it so suited to this method… I do the same with knitting,, but it’s a lot more difficult… Been doing K and C since i was 10 and had the distinct advantage of a mentor from age 14..Began working for her in her yarn shop until the birth of my first child.. He is now 47!!! It’s a lifetime thing for me and cannot imagine sitting without some sort of needle or hook! At 70 I am forever grateful for all the info shared by people like yourself… Bless you.. Thanks Barbara Johnson aka GrammaBabs:)
I would have liked to see more pictures of the sweater from different angles. Also would like to download this pattern but don’t see where I can do that.
WOW !! This pattern it SO nice !! Even my “no cardigan” husband like this design, and that’s sayin’ something. It is now on my ‘make’ list. I think I’ll make one for myself as well. Thank you for giving us such a great pattern. Wishing you a wonderful holiday season. Hugs !
Wow that made my day, Judi!!! Thank you!!
I have a question about panel B. There is a “Cbl-A” at the beginning but not the end according to the pattern. However, the picture looks like there is one at the end as well. Am I missing something or seeing wrong? Thank you. And I Love this pattern, it’s working up so quickly!
I have this pattern in your “Design for Guys” book BUT, when googling Moda Dea Fashionista yarn, it appears to be no longer available? Do you know anywhere I can get it? or do you have a substitute yarn to suggest??
Drew, this pattern is absolutely stunning! You are a remarkable designer! To take a pattern that is normally knitted and convert to crochet amazing. I really like your designs. Thank you for sharing your talent with the crafting world. I know I appreciate all the designer’s who share their patterns for free. I can’t afford to buy downloadable patterns as I’m on limited income. Thank you again.