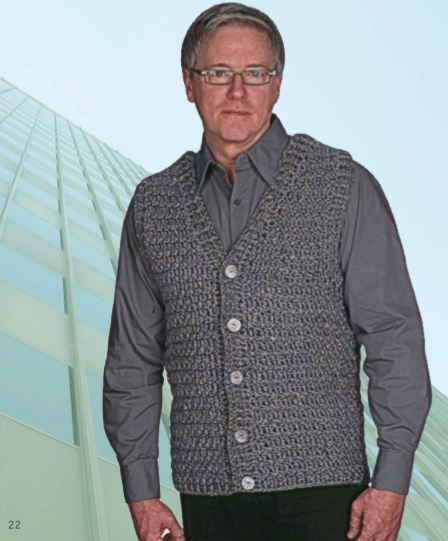
Every guy should have one of these in his wardrobe. Made in a neutral color, it goes with any shirt he has and will become the workhorse of his closet. I designed this version to be longer than usual to emphasize the comfort factor.
Stock Sweater
©2008-2016 Drew Emborsky, aka The Crochet Dude®
Skill Level
Beginner
Finished Size
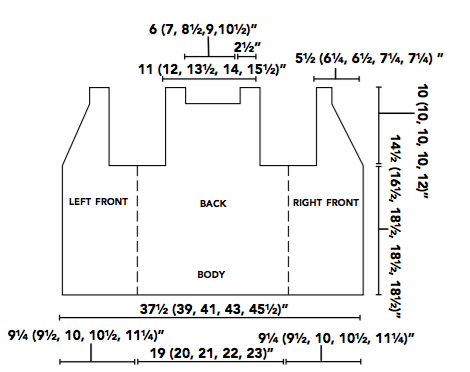
Sizes: S (M, L, XL, XXL): 39 (401⁄2, 421⁄2, 441⁄2, 47)”/99 (103, 108, 113, 119.5)cm
Sweater shown in size L.
You Will Need
678 (767, 861, 900, 1002)yd/620 (702, 788, 823, 917)m of 5 bulky weight yarn, in gray
Shown in: Patons Shetland Chunky Tweeds, 72% acrylic/25% wool/3% viscose, 3oz/85g = 108yd/99m per skein
Hook: 6.00mm (size J-10 U.S.) (or size to obtain gauge)
Yarn needle
Stitch markers
Stitches Used
Back post double crochet (BPdc) Chain stitch (ch)
Double crochet (dc)
Front post double crochet (FPdc) Slip stitch (sl st)
Treble crochet (tr)
Special Stitch
Double crochet two together (dc2tog): (Yo, insert hook in next st, yo, draw yarn through st, yo, draw yarn through 2 lps on hk) twice, yo, draw yarn through 3 lps on hook.
Double crochet three together (dc3tog): (Yo, insert hook in next st, yo, draw yarn through st, yo, draw yarn through 2 lps on hk) 3 times, yo, draw yarn through 4 lps on hook.
Gauge
11 sts x 9 rows = 4”/10cm in pattern stitch
Always take time to check your gauge.
Note: Sweater is worked as one piece.
1 x 1 Ribbing Pattern
Ch required number of sts.
Row 1: Dc in 4th ch from hook and in ea ch across, turn.
Row 2: Ch 2 (counts as hdc), *FPdc around the post of next st, BPdc around the post of next st; rep from * across to within last 2 sts, FPdc around the post of next st, hdc in last st, turn.
Row 3: Ch 2 (counts as hdc), *BPdc around the post of next st, FPdc around the post of next st; rep from * across to within last 2 sts, BPdc around the post of next st, hdc in last st, turn.
Rep rows 2–3 for pattern.
Pattern Stitch
Row 1: Ch 4, sk next st, *dc in next st, ch 1, sk next st; rep from * across to within last st, dc in last st, turn.
Row 2: Ch 3 (counts as dc), *working over ch-1 sp, tr in next skipped st 2 rows below, dc in next dc in current row; rep from * across, ending with a dc in last st. Rep rows 1–2 for pattern.
Body
Ch 105 (109, 115, 121, 127).
Work in 1 x 1 ribbing pattern through row 2—103 (107, 113, 119, 125) sts.
Work even in pattern stitch until piece measures 141⁄2 (161⁄2, 181⁄2, 181⁄2, 181⁄2)”/37 (42, 47, 47, 47)cm from beg, ending with a RS row.
Left Front
Work in pattern stitch across first 16 (17, 18, 20, 20) sts, turn.
SHAPE NECKLINE
Work in pattern stitch, dec 1 st (dc2tog) at neck edge at end of next row and every other row 6
(7, 6, 6, 6) times; then dec 2 sts (dc3tog) at neck edge at end of next row and every other row 0 (0, 1, 2, 2) times—7 sts at end of last row. Work even in pattern stitch until piece measures 241⁄2 (261⁄2, 281⁄2, 281⁄2, 301⁄2)”/62 (67.5, 72.5, 72.5, 77.5)cm from beg. Fasten off.
Back
Next row: With WS facing, sk 20 sts to the left of last made in first row of left front, join yarn in next st, starting in same st, work even in pattern stitch across next 31 (33, 37, 39, 43) sts, turn.
Work even until piece measures 5 rows less then finished left front.
SHAPE SECOND SHOULDER
Next row: Work in pattern stitch across first 6 sts, turn leaving rem sts unworked. Work even in pattern stitch for 4 more rows. Fasten off.
Next row: With WS facing, sk 17 (19, 23, 25, 29) sts to the left of last made in first row of first shoulder, join yarn in next st, starting in same st, work even in pattern stitch across, turn—7 sts.
Work even in pattern stitch for 4 more rows. Fasten off.
Right Front
Next row: With WS facing, sk 20 sts to the left of last made in first row of back, join yarn in next st, starting in same st, work even in pattern stitch across, turn—16 (17, 18, 20, 20) sts. Work same as left front, reversing shaping.

Assemble
Sew shoulder seams.
Finishing
ARMHOLE EDGING
Rnd 1 (RS): With RS facing, join yarn at center bottom of armhole, ch 3 (counts as dc), dc evenly around, working an even number of sts, sl st in 3rd ch of beg ch-3 to join, turn.
Rnd 2: Ch 2 (counts as hdc), *FPdc around the post of next st, BPdc around the post of next st; rep from * around to within last st, FPdc around the post of last st, sl st in 2nd ch of beg ch-2 to join, turn.
Rnd 3: Ch 2, *FPdc around the post of next FPdc, sk next BPdc; rep from * around to within last st, FPdc around the post of last st, sl st in 2nd ch of beg ch-2 to join. Fasten off.
SWEATER EDGING
Row 1: With RS facing, join yarn at bottom right-hand corner of right front, ch 3, dc evenly across right front edge, across back neck edge, and down left front edge to bottom left-hand corner of left front, working an odd number of sts, turn. Place 5 markers for buttonholes on left front edge, placing 1st marker 1”/2.5cm above bottom edge and ea rem marker 4”/10cm above last marker.
Row 2: Ch 2 (counts as hdc), working ch 1, sk next BPdc at ea marker for buttonholes, work *FPdc around the post of next st, BPdc around the post of next st; rep from * across, to within last 2 sts, FPdc around the post of next st, hdc in last st, turn.
Row 3: Ch 2 (counts as hdc), working hdc in ea ch-1 buttonhole sp, work *BPdc around the post of next st, FPdc around the post of next st; rep from * across to within buttonholes. last 2 sts, BPdc around the post of next st, hdc in last st, turn.
Row 4: Ch 2 (counts as hdc), *FPdc around the post of next st, BPdc around the post of next st; rep from * across to within last 2 sts, FPdc around the post of next st, hdc in last st, turn. Fasten off. Sew buttons on right front button band to correspond with
Weave in ends.
The Crochet Dude® is a registered trademark of Drew Emborsky, all rights reserved. Do no copy or distribute this pattern – but please share the link with all your friends! Click the green Print Friendly button to print or save as a PDF for your own use.
Please click one of the icons below to share this tutorial on your favorite social media sites!
Add this project to your Ravelry queue: 


Thank you !
Do you have something similar that has long sleeves???